Advanced Features of JoyToKey
Virtual joysticks (a.k.a. SHIFT-key function)
Assume your joystick has only 6 buttons, but you want to assign 10 different key inputs to your joystick buttons. What can you do?
In that case, you can configure extra key assignments for a virtual joystick number and switch to them by pressing a special joystick button (a.k.a. SHIFT-key button).
For example, by default you are using the key/mouse assignments defined for Joystick #1.
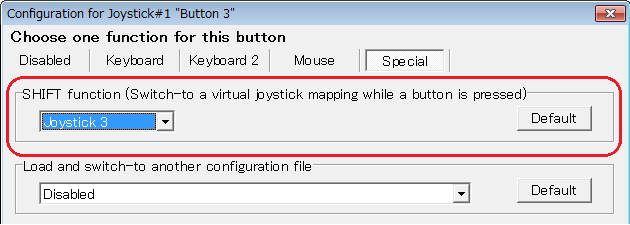
However, in the example below, you can switch to the key/mouse assignments
defined for Joystick #3 whenever "button 3" is pressed.
Switch across multiple key assignments
JoyToKey allows you to assign two or three sets of key assignments to a single button, and switch among them in several ways.
- Switch in rotation
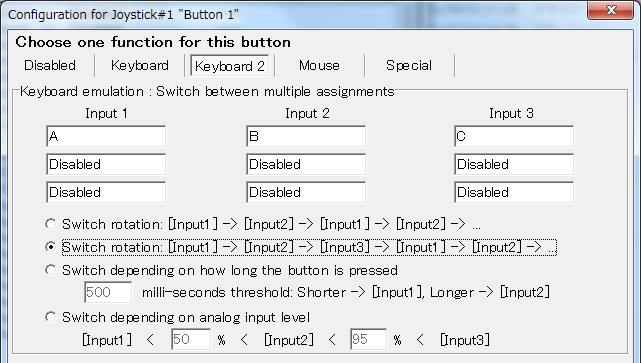
In the sample screenshot below, the key assignments will rotate as shown below whenever the button is pressed.
"A -> B -> C -> A -> B -> C-> A -> ..." - Switch based on press-duration
Input can change depending on how long the button is pressed.
- e.g. small jump key if the button is pressed for less than 300 milliseconds
- e.g. big jump key if the button is pressed for more than 300 milliseconds - Switch based on analog input level
For analog stick inputs, the assignment can change depending on the analog input level.
- e.g. small stick input => slow movement key
- e.g. large stick input => fast movement key
Button Alias (Mapping) - Combine multiple definitions (e.g. "SHIFT + Mouse Wheel")
How can I configure horizontal scrolling (SHIFT + Mouse Wheel) with a single stick (button) input?
JoyToKey has a powerful feature called "Button Alias", which can be used in two different scenarios:
- Assign more (virtual) buttons beyond the number of buttons physically available
- Assign multiple functions for one button input
To assign multiple functions to a single input (such as SHIFT key + mouse cursor/wheel movement), you can define a button alias (mapping) from "Options" -> "Button Mapping".
For example, in the screenshot below, Button19 is configured to be triggered when stick-left is pressed. Next, assume that you have configured stick-left as a SHIFT key and Button19 as a wheel rotation. Then, when stick-left is pressed, Button19 will also be triggered, so "SHIFT + wheel rotation" will be emulated.
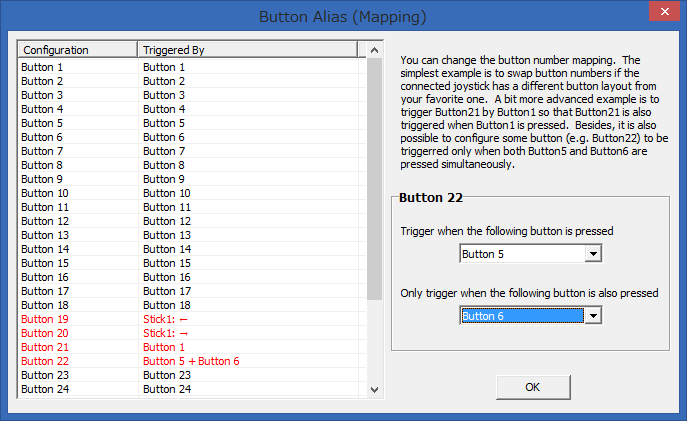
It is also possible to configure a button (e.g. Button22) to be triggered only when both Button5 and Button6 are pressed simultaneously. This way, you can assign three different functions to two buttons: Button5 alone, Button6 alone, and Button5 and Button6 pressed together.
Define a priority among multiple joysticks
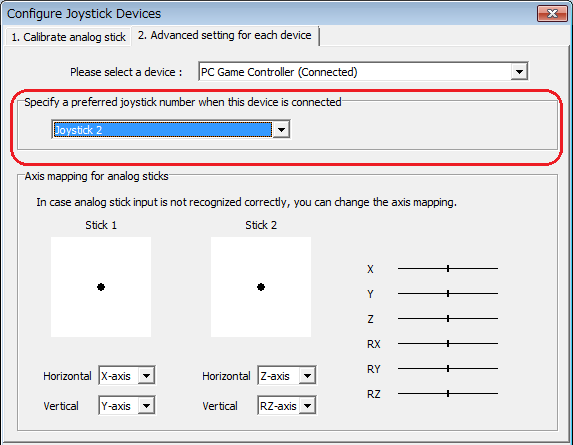
If you have multiple joysticks and always want to use one of them as "Joystick 2" (or any other joystick number),
you can define a priority/preferred number for each device.
(Menu: "Preferences" -> "Configure joysticks")
In this window, you can also configure the axis mapping for Stick1 and Stick2.
Command line arguments
JoyToKey supports the following command line arguments. For normal usage you don't need them, but they can be useful if you want to create a shortcut to control JoyToKey without using the graphical user interface.
- Usage:
- JoyToKey [-r] [profile]
- -r
- If JoyToKey is already running, it sends a message to the running instance, forcing it to refresh the list of joystick devices. This argument can be used to create a shortcut for detecting newly connected joysticks.
- profile
- JoyToKey will be started with the specified profile. If JoyToKey is already running, the specified profile name is sent to the running instance and the active profile is switched. This argument can be used to create a shortcut for switching profiles.
Change the location of configuration files
By default, configuration files (JoyToKey.ini and profiles) are stored in either
- the “JoyToKey” folder under the user’s Documents folder (if installed with the installer)
- or the same folder as “JoyToKey.exe” (if installed from the ZIP file)
In addition, you can pass a profile as a command line argument when launching JoyToKey. JoyToKey will then start with the specified profile and use its folder for loading/saving profiles.
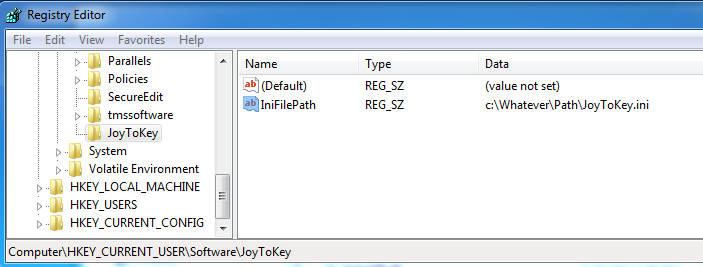
Furthermore, you can explicitly set the location of the JoyToKey.ini file (which contains your preferences and license registration information) and the location of profiles through the registry. However, please note that editing the registry directly can be dangerous, so it is recommended only for advanced users who understand the following steps. Please use it at your own risk.
- Run “regedit” program (Registry Editor)
- Create a key “HKEY_CURRENT_USER\Software\JoyToKey”
- Create a string value “IniFilePath=c:\Whatever\Folder\JoyToKey.ini” if you want to use a specific JoyToKey.ini location
- Create a string value “DataDir=c:\Whatever\Folder” if you want to use a specific folder for storing/loading profiles (you probably don’t want this when using a launcher)
Next: Useful TIPS